How To Use Group Policy Management Console to Disable Browser Choice?
We previously shared a quick tip about a registry tweak using which you can disable browser choice update screen on windows. Off late, I have found a lot of people still asking how they can disable the browser choice screen in Windows.
The registry tweak was based on a knowledge base article (KB2019411) released by Microsoft, explaining how IT administrators can disable a Browser Choice screen for their users using a simple registry key. Now, you can get the same result by using the Group Policy Preferences editor and its also easier to use than the registry editor.
Note:
- If your computer is running Windows 7, the Browser Choice application removes Internet Explorer from a pinned location on the Start menu and in the taskbar.
- If you do not set Internet Explorer as your default Web browser, the Browser Choice application does not make any changes to your computer.
Use Group Policy to Disable Browser Choice
- Press [Windows Key] + [R] to open the Run dialog box and type
gpedit.mscto open Group Policy Management Console. -
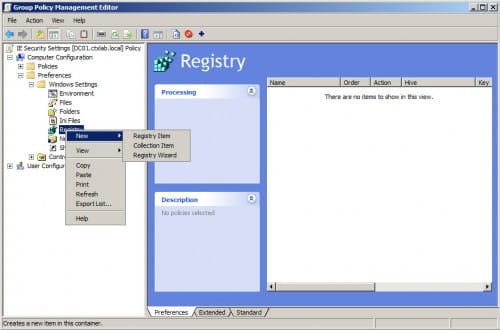
Now, navigate to Computer Configuration > Preferences > Windows Settings > Registry.

- Here, right-click and create a new registry item (Registry > New > Registry Item).
-
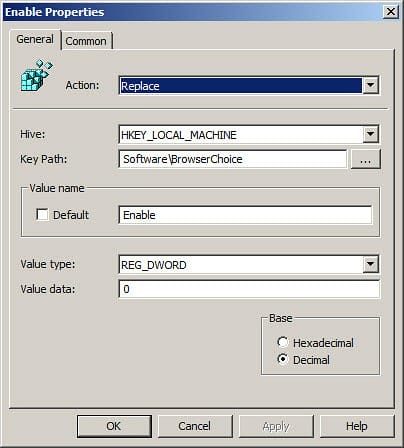
Type
SoftwareBrowserChoicein the Key Path then typeEnablein the Value name, then select REG_DWORD as the value type0in the value data and then click OK.

- You can then restart the computer to see that the browser choice screen does not appear again.

![Win Picture Collage Maker Pro License Worth $39.90 [Expired]](https://cdn.mytechguide.org/wp-content/themes/hueman/assets/front/img/thumb-medium-empty.png?strip=all&lossy=1&ssl=1)

